
Key takeaways
- The four-exercise chair routine works hip abductors, glutes, and hip flexors separately, producing faster strength gains than compound movements alone.
- Each exercise lasts 45 seconds with 15-second transitions, totaling 10 minutes and making the routine sustainable three to five times per week.
- Form prioritizes smooth, controlled movement with the lower back inactive; progress by adding a third round or increasing band tension once movements feel stable.
Chair-based routines surprise participants with their effectiveness. Most people assume that seated exercises feel light—a stepping stone before “real” workouts—yet focused hip work from a chair generates noticeable muscular engagement from the first few sets. A strength coach working with older clients observes this pattern consistently: individuals expecting a permissive session discover instead that purposeful movement creates legitimate strength stimulus, all without leaving the chair or needing gym equipment.
This observation points to an important principle about strength training after 65. The traditional squat remains valuable, yet it treats hip strength as a secondary outcome. Targeting the outer hip muscles (abductors), glutes, and hip flexors as distinct groups often produces faster results because the work stays exactly where it should land, eliminating compensations that allow weaker muscles to take over.
Your Hip Muscles and What They Do
Three muscle groups handle the heaviest responsibilities when you move through daily life. Your abductors, the muscles on the outer side of your hips, keep your legs steady when you walk, stand, or shift your weight. Your glutes and thigh muscles power the movement every time you sit down, stand up, or climb a set of stairs. Your hip flexors, located at the front of your hips, lift your knee when you walk, step over an obstacle, or reach for something at ground level. These three groups work together in compound movements like squats, but training them separately teaches each one to pull its own weight more effectively.
Setting Up the Routine
Equipment requirements stay minimal. You need a sturdy chair that doesn’t roll or slide when you press weight into it. A mini resistance band makes the first exercise more challenging and helps you feel the correct muscles working, though the routine functions without one if a band isn’t available.
The timing structure is straightforward. Perform each exercise for 45 seconds, then spend roughly 15 seconds transitioning to the next position and catching your breath. Four exercises make up one round. Complete the same four-exercise sequence twice through, and you’ll accumulate about eight minutes of active work. The extra two minutes accommodates band setup, position changes, confirming the chair feels secure, or taking time to ensure smooth transitions between moves.
The Four Hip-Focused Exercises
Seated Band Abduction
This exercise targets the outer hip muscles from a comfortable seated position. Sit on the chair with your back against the seat back and your feet flat on the floor. If using a band, loop it around both thighs just above the knee. Press your knees outward against the band’s resistance, pushing steadily without jerking. The band creates clear feedback so you can feel which muscles are working. Keep the reps smooth rather than explosive, and pause briefly while the band is under tension before returning to the starting position. Keep your feet planted as your knees press outward.
Variations: Use a lighter band for days when you want less resistance, place the band above the knees instead of below them for a slightly different angle, or add a brief pause at the furthest point of the movement to increase time under tension.
Chair Box Squat
This variation of the traditional squat feels more accessible and controlled. Stand facing the chair with your feet roughly hip-width apart. Lower yourself toward the chair seat by bending your hips and knees, lightly touching the chair as you reach the bottom of the movement. Then stand back up with control, squeezing your glutes at the top as your hips extend. The chair serves as a depth target and safety reference, helping you repeat the same movement depth each rep and making it easier to feel your hip muscles working. Keep the touch on the seat light rather than putting your full weight down.
Variations: Use a taller chair to reduce the range of motion, use your hands on the seat for balance if needed, or slow down the tempo by spending more time in the lowering and rising phases.
Chair Hip Extension
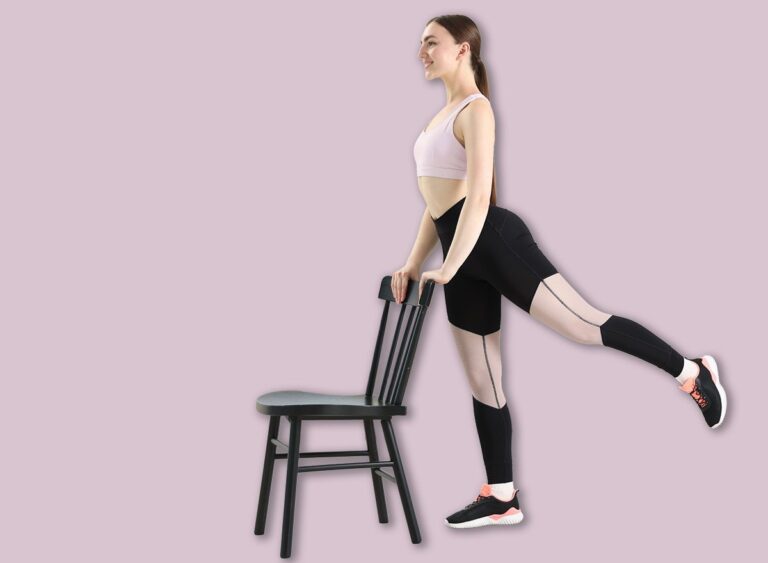
This exercise gives your glutes more direct attention than compound movements. Stand facing the back of the chair and hold it for balance. Keeping your torso tall, extend one leg behind you by squeezing the glute at the top of the movement. Lift the leg only as far as you can without arching your lower back—a smaller range of motion often works better because it keeps tension in the hip instead of creating compensatory arching. Alternate legs, or perform all reps on one side before switching.
Variations: Maintain an even smaller range of motion if back safety is a priority, alternate sides smoothly for rhythm and balance work, or add a mini resistance band around both legs for additional resistance.
Seated Marching
This exercise targets your hip flexors, the muscles at the front of your hip that lift your knee when you walk or climb. Sit on the chair with your back supported and your feet flat. Lift one knee up toward your chest by contracting the front of your hip, then lower it back down. Alternate sides in a controlled march rhythm. The chair supports your back, letting you sit tall and isolate the hip flexor muscles without rushing the movement. Pause briefly at the top of each knee lift to make each repetition feel intentional rather than bouncing through the movement quickly.
Variations: Use a smaller range of motion by not lifting the knee as high, pause longer at the top of each lift, or add a light resistance band around the thighs for additional resistance.
Form Principles That Keep You Safe
The lower back should not be doing the work during any of these exercises. If you notice your lower back taking over—usually felt as arching or excessive hollowing—reduce the range of motion or slow down the tempo. Smooth, controlled reps matter more than speed. Your hips should feel actively engaged, with clear muscular effort, but the movement should never feel jerky or unstable. If an exercise doesn’t feel secure, adjust the chair position, check that it’s on level ground, or reduce the range of motion until the movement feels reliable.
Building Consistency and Progressing
This routine works best when it feels sustainable to repeat. Perform the routine three to five days per week, ideally on days when you want a focused session that doesn’t require travel to a gym or extensive equipment setup. Start with smooth, controlled reps using body weight alone or a light band. Once the movements feel stable and the sensation of working hip muscles becomes clear, add a third full round to the routine or increase the band tension. Progress gradually: the goal is to build a session you return to consistently, not to max out effort immediately. Your hips should feel like they’re powering the work without your lower back compensating. When this becomes clear, you’ll know the routine is working correctly.
Frequently Asked Questions
How long does the 10-minute chair routine actually take to complete?
The routine runs 10 minutes total, with 45 seconds of work per exercise and 15-second transitions. This totals about 8 minutes of active work, with the extra time used for band setup, position changes, and catching your breath between exercises.
What muscles does the seated chair routine train?
The routine targets three main hip muscle groups: your abductors (outer hip), glutes and thigh muscles, and hip flexors. Each of the four exercises focuses on one or more of these groups to build strength you use when walking, climbing stairs, or standing from a seated position.
Can I do the chair routine without a resistance band?
Yes, the routine functions without a band. A mini resistance band helps you feel the correct muscles working during the seated band abduction exercise, but you can complete the full four-exercise sequence using just your body weight.
