
Key takeaways
- Holding a glute bridge for 90 seconds or more represents top-tier core strength for people over 65, while two minutes or more indicates seriously strong glutes and abs.
- Short training sets at 60-75% of your maximum hold time, performed three times per week, build core endurance safely without encouraging form breakdown.
- As core strength improves, daily activities become noticeably easier—standing from a chair, carrying groceries, getting out of bed, and walking all require less effort and cause less pain.
Your core strength after 65 isn’t just about your abs. According to fitness guidance from Eat This Not That, your core includes your abdominals, back, glutes, and hamstrings—the entire central kinetic chain responsible for stabilizing your body through daily movement. These muscles keep you upright when you stand from a chair, carry groceries, or walk to your car. After 65, endurance in this region becomes particularly critical because weak core muscles force compensation. When your core muscles fatigue, your lower back compensates, leading to lower back fatigue and pain. Similarly, weak glutes shift load to your knees, causing knee pain as you age. A single test—the glute bridge hold—can reveal whether your core has the endurance to handle these demands.
The Glute Bridge Hold Test
Setting Up Correctly
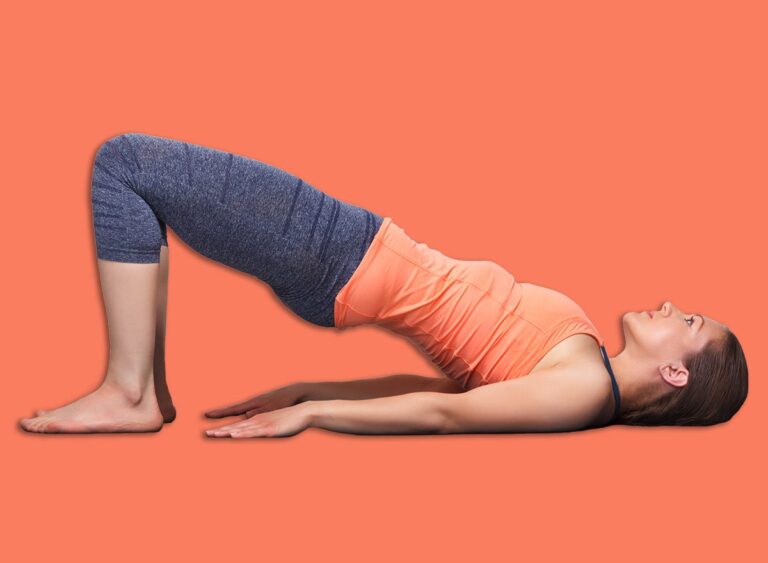
The glute bridge is one of the most direct measurements of core endurance. To set up properly, lie on your back on a mat with your knees bent at a 90-degree angle. Position your feet flat about hip-width apart, with your heels roughly a hand’s length from your glutes. Rest your arms at your sides, palms facing down. If you need additional support, place a folded towel under your head.
Before beginning your timed test, perform a few easy bridges to warm up your hips. Once you begin the actual test, brace your abs, press through your heels, and squeeze your glutes as you raise your hips. At the top of the movement, your body should form a straight line from your shoulders to your knees. Breathe normally throughout, keep your hips level, and continue engaging your core. The entire challenge lies in holding this position still without allowing your body to shift or sag.
Recognizing When to Stop
Stop immediately if your hips sag downward, if one hip dips below the other, or if your lower back begins to compensate and take over the movement. If you feel anything sharp, numb, or tingly—sensations that signal nerve involvement or unsafe strain—stop right away and exit the position in whatever way feels safest to you. These signals indicate either that you’ve reached your genuine physiological limit or that you’ve begun to use poor form, both valid reasons to pause and reset.
What Your Results Mean
Two minutes or more of holding indicates seriously strong glutes and abs. According to Eat This Not That’s assessment framework, anything beyond the 90-second mark represents top-tier performance for people in this age group. Holding for less than 90 seconds doesn’t indicate failure; it simply identifies you as part of the much larger group with clear room for improvement, which is normal and expected for most people starting this test.
Training to Build Your Bridge Time
Progressive Training Protocol
Building bridge endurance works best through short, repeated efforts rather than all-out maximum attempts. If your best current time is 40 seconds, Eat This Not That recommends beginning with 2 to 3 sets of 25 to 30 seconds, with a minute of rest between sets. Each set should hit roughly 60–75% of your maximum time. Perform this training three times per week and aim to add a few seconds each week. This gradual progression builds real strength without encouraging overreach or the compensation patterns that develop when fatigue sets in.
Marching Bridge Progression
Once you establish a solid bridge hold, the marching bridge adds a significant control element. While maintaining your bridge position, float one foot an inch or two off the floor, then set it back down and switch to the other side. Your hips will naturally want to tip toward the floating leg—resisting that impulse builds lateral core strength and stability. Complete 6 to 10 slow marches on each side, focusing on keeping your pelvis level throughout. The marching bridge teaches your body to maintain core tension even when movement introduces an imbalance challenge.
Beyond the Bridge
Prone Back Extension
The prone back extension targets the muscles running along your spine, the ones most tied to balance and mobility for daily tasks. Lie face down on a mat with your arms at your sides and your forehead on the floor. Squeeze your glutes and lift your chest a few inches off the ground while keeping your neck long and your gaze directed down. Hold this lifted position for 10 to 20 seconds, lower yourself with control, and repeat three or four times. Keep the lift modest—correct body positioning and muscle engagement matter far more than how high you lift.
Measuring Real Progress
As your bridge hold time increases, you’ll observe strength gains in everyday movement. Standing up from a low chair becomes noticeably easier because your glutes now have the endurance to drive the movement without your lower back compensating. Moving bags in and out of your car requires less effort and causes less strain. Getting out of bed in the morning likely produces less lower back pain—a particularly noticeable improvement for anyone who starts their day wincing. Walking to your car feels less taxing because your core can stabilize your body through each step.
These functional improvements matter more than any number on a timer. The bridge test time is simply a way to track whether your training is working; the real reward is moving through your day with less discomfort and greater ease. You’ll likely notice you can stand longer in line at the store, carry groceries further without lower back fatigue, and get out of a low chair without using your arms to push yourself up.
Retest your bridge hold time every three to four weeks using the identical setup each time. Record your best time and note how your daily movement feels. Each additional second you hold cleanly improves your core stability and makes daily movement considerably easier. This measured progress—real, tangible improvement you can feel in how your body moves—becomes its own motivation to continue training.
Source: Eat This Not That
Frequently Asked Questions
How long should I hold a bridge to have good core strength after 65?
According to Eat This Not That, holding a bridge with perfect form for 90 seconds or more represents top-tier performance for this age group. Two minutes or more indicates seriously strong glutes and abs.
What should I do if I can only hold a bridge for 30 or 40 seconds?
Start with 2 to 3 sets of 25 to 30 seconds at 60-75% of your maximum hold time, rest one minute between sets, and practice three times per week. Aim to add a few seconds each week with this gradual approach.
What do I do if I feel sharp pain, numbness, or tingling while doing the bridge hold?
Stop immediately and exit the position in whatever way feels safest. These sensations signal either that you've reached your limit or that you're compensating with poor form—both reasons to pause and rest before trying again.
