
Key takeaways
- A 60-second glute bridge with perfect form indicates elite core and hip strength for adults over 60; 30 seconds is a solid starting goal.
- Proper form requires feet hip-width apart, knees at 90 degrees, level pelvis, and a straight line from hip to knee throughout the hold.
- Progress slowly by starting with 2 sets of 5-10 second holds, adding a third set, then gradually extending duration as strength improves.
- Advanced variations like weighted bridges and single-leg holds can extend your training once the standard bridge becomes easy.
The glute bridge stands as one of the most effective ways to test how well your core and hip strength have held up over the years. Unlike exercises that isolate a single muscle group, the bridge demands coordination across your abdominals, glutes, lower back, and core stabilizers all at once. Beyond assessment, the glute bridge itself becomes valuable training—it activates the glutes, which many strength routines leave neglected, and it builds the hip and core stability that keeps lower back pain at bay.
Why the Glute Bridge Matters After 60
Core strength doesn’t just improve how you look; it determines how easily you move through daily life. The glute bridge tests whether your muscles can work together to stabilize your body against gravity, a skill that matters when you reach for something on a high shelf, get out of a car, or simply stand for long periods. The glutes, in particular, support nearly every lower-body movement and provide the power needed for stairs and walking—yet strength training programs often leave them out.
Lower back pain becomes more common with age, but a strong core and active glute muscles provide protection. The bridge specifically engages these stabilizers, building the foundation that reduces injury risk.
The 60-Second Benchmark: What Elite Strength Looks Like
The 60-Second Goal
If you can hold a glute bridge for a full 60 seconds after age 60 while keeping your pelvis level, your hips elevated, and your core engaged, you’re demonstrating an elite level of hip and core strength. This isn’t a casual hold—it requires sustained tension and proper alignment throughout.
Starting from 30 Seconds
Most people should begin with a 30-second benchmark as their initial target. This gives you a realistic goal to work toward without demanding strength you may not yet have built. Even 30 seconds, held with perfect form, indicates meaningful core and hip stability.
The Form Requirements
Simply holding any position for 60 seconds doesn’t count. Your form must remain excellent throughout: your pelvis stays level (no twisting), your hips stay fully elevated, and your core stays tight. If your lower back arches or your abs disengage, the test becomes a false measure of strength.
How to Set Up and Perform the Glute Bridge Correctly
Getting Into Position
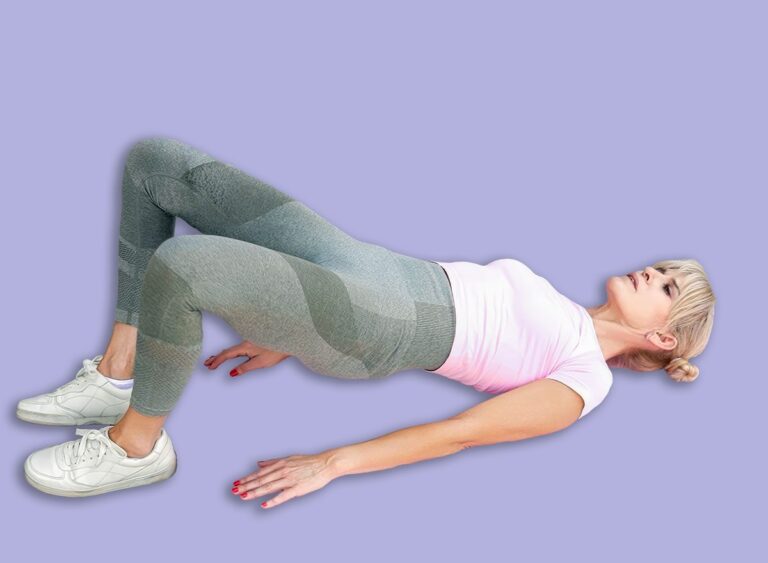
Start by lying on your back with your feet flat on the ground, positioned hip-width apart. Your knees should bend at a 90-degree angle. This setup ensures you’re working from a stable base. Brace your abdominal muscles as if you’re preparing to take a punch—this engagement carries through the entire hold.
The Lift and Hold
Push through your feet, squeeze your glute muscles hard, and let your hips rise gently off the ground. Your hips should reach full extension so that a straight line runs from your hip all the way down to your knee. This alignment ensures your glutes and core are doing the work, not your lower back. Keep your breathing normal throughout the hold—holding your breath creates unnecessary tension and limits how long you can maintain the position.
Recognizing When Form Breaks Down
The test ends the moment your form deteriorates. If your hips twist, drop below the ideal height, your lower back starts to arch excessively, or the position becomes painful, stop immediately and record your time. Pushing through poor form teaches your body incorrect movement patterns and increases injury risk.
Building Your Hold Time: A Progressive Approach
If You’re Starting From 15 to 20 Seconds
If your first attempt yields only 15 to 20 seconds, that’s your honest baseline. Rather than frustrating yourself by chasing 60 seconds, start with much shorter intervals that you can definitely complete with good form. Begin with 2 sets of 5 to 10 seconds each, resting between sets.
Gradually Increasing Sets and Duration
Once the initial short intervals become easy, add a third set. As your body adapts, begin extending the duration of each set to 15 seconds or longer. Build your endurance slowly; this approach prevents overuse injuries and ensures your form stays strong as you progress. The total work time matters less than the quality of each repetition.
The Path to 60 Seconds
Some people reach 60 seconds within a few weeks; others take several months. The timeline depends on where you start and how consistently you train. Patience here pays off—rushing the progression or abandoning perfect form to hit a time goal defeats the purpose of the test.
Adding Weight and Advanced Variations
The Weighted Bridge
Once the standard bridge becomes easy, place a light dumbbell over your thighs and hold it there as you perform the hold. The extra weight increases the demand on your core and glutes without changing the basic movement pattern. Start with a weight you can control smoothly.
Single-Leg Bridge Progression
More advanced exercisers can challenge themselves with the single-leg variation. Lift one foot off the ground with that leg straight while the other knee stays bent with the foot flat on the ground. As you lift both hips at the same time, keep your pelvis level so your hips don’t twist to one side. Single-leg work demands far more stability and strength.
Progressive Timeline for Advanced Moves
If you’re tackling either weighted or single-leg variations, start with holds of 15 to 20 seconds. Over time, you can build your endurance to reach 60 seconds even with the added challenge. Never jump from the standard bridge straight to a heavy dumbbell or single-leg hold without a preparation phase.
Common Form Mistakes and Safety Notes
The most frequent error is overarching the lower back while letting the abs disengage completely. This flips the balance of effort away from your core and toward your lower back, reducing the test’s validity and increasing discomfort. The second mistake is letting your hips drop or twist mid-hold and continuing anyway—this suggests the time you’re recording isn’t a true measure of strength. Always prioritize form over duration.
If pain appears (beyond simple muscle fatigue), stop immediately. Discomfort in your lower back especially warrants a check-in with a healthcare provider before continuing. The glute bridge is a safe movement, but only when executed correctly.
Frequently Asked Questions
How long should I hold a glute bridge to show good core strength after 60?
A 30-second hold is a solid starting benchmark for most adults over 60, while a 60-second hold with perfect form indicates elite-level core and hip strength.
What are the most common form mistakes people make with the glute bridge?
The most frequent errors are overarching the lower back while letting the abs disengage and allowing the hips to drop or twist mid-hold. Both reduce the test's effectiveness and increase injury risk.
How do I progress from shorter holds to reaching 60 seconds?
Start with 2 sets of 5-10 seconds if you can only hold for 15-20 seconds initially. Add a third set as it becomes easier, then gradually extend each set's duration to 15 seconds or longer.
